Tuesday, February 26, 2013

DIY Glitter Pumps (again!)

Everyone knows I love mod podge. I rave about this stuff. I use it for everything. I use it as glue, I use it to glitter mini clothes pins as stocking stuffers and most importantly, I used it to glitter a pair of flats.

It all started with Miu Miu. Miu Miu shoes are a perfect combination of glitter and girly rolled into one.

Miu Miu Glitter Pumps $630

I loved the curved chunky heel that Miu Miu utilized in a lot of their heels with this collection. Of course at $630 for a pair of gold glitter pumps, it was kind of out of the question.

Then I saw this at Madewell

Madewell Frankie Pump $218 (now on sale for $174.99)

It's missing the curved heels but I did like the toe shape a little bit more. But again, $218 for a pair of "fun" shoes seemed out of my budget, even on sale.

I forgot about these pumps until I walked into Urban Outfitters and stumbled upon this pair of shoes.

Kimchi Blue Gretel Suede Pump $59 (on sale for $39 online, $19.99 in store)

It's very reminiscent of the Miu Miu heels with the rounded toe shape of Madewell Frankie pumps. Of course finding out it was $19.99 was motivation to DIY my own glitter version. Because the pair I wanted was a display shoe, it had a lot of scuffing. For my purposes, I was going to cover it anyway but Urban Outfitters gave me an extra 15% off making my purchase even sweeter!

So to create the glitter pump look, you need a couple of things. (All can be purchased at your local Michaels for a total cost of $12 to $15)

The most important supply!
Mod Podge, best stuff on Earth

And of course your choice of glitter. I chose two different shades of gold. The antique silver I used as a base and the smoky quartz is a darker gold that I used on top to create texture and dimension. 

Martha Stewart Antique Silver and Smoky Quartz


On a scrap piece of cardboard, mix mod podge and the antique silver glitter at a 2:1 ratio. The consistency should remain on the runnier side. Foam brushes are cheap and easy to use but any wide brush can be used to apply the glitter/mod podge mix. 


Use your foam brush to apply a thin layer all over the shoe. The thicker the mod podge or the more layer you apply, you run the risk of "cracking" the glue in areas of the shoes that bend with normal wear. So apply as thin as possible.

It won't look like much in the beginning but the white mod podge will dry clear. Use masking tape to cover up areas that you don't want to get glitter on. I applied it on the heel tip as I tend to make a bit of a mess.


When you apply mod podge mixed with the glitter on the shoe, the glitter tends to dry matte. The shine of the glitter tends to get muted, so I decided to add another top layer. I applied just mod podge all over the shoe and sprinkled the smoky quartz glitter on top rather than mixing it up first. Notice the difference in the shine?


But the method of sprinkling the glitter on the mod podge is that you might be shedding glitter for a little while. I shook off the glitter when the mod podge dried and reapplied the bald spots several times before I was happy with the final result. 


My own DIY glitter pump


The picture does not do it justice. The glitter is even shinier in person! Now if I can only think of a place to wear this to :D

Saturday, September 22, 2012

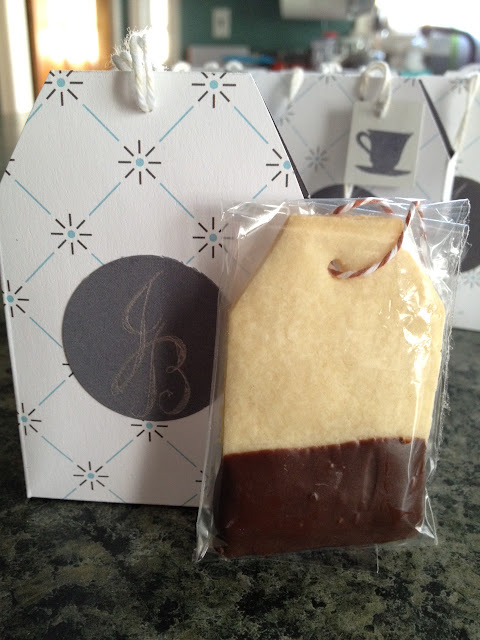
Teabag party favors

It's been a long time hasn't it?? I am sorry for the lack of posts. I have been making and crafting things all this time but have failed to document it.

My latest project was a collaboration with Pauline Bakes. She was making tea bag cookies for a tea party bridal shower and wanted a cute way to package it. I have seen some great ideas on pinterest that packaged the cookies in the shape of a tea bag but wasn't quite what I had wanted. So, I set about to make my own template and created my own little favor packaging for this tea party theme bridal shower.


Here is a step by step tutorial!


The supplies! A scoring board is very useful for creating precise lines for folding. It allows for a clean straight line making your final product look much cleaner. 


1) Cut a pattern paper of your choice in the size of 4" by 8.5"
2) Score along the dashed lines at the size indicated


3) Cut as indicated by the white lines on the picture. The angle of the top of the tea bag is your choice. I chose to angle it by 0.5" from the end.


4) This is what your template should look like before you start putting it together.


5) Overlap the sides and glue. It should stand on its own like this


6) Using the small hole puncher, punch a hole on top of the teabag and thread your twine through. (Before tying off the string, put your cookie or treat of choice at this time before closing it off) 
7) On a small square piece of paper, stamp any cute image. I chose this little tea cup to stamp.


8) Tie to the twine to finish your teabag look.


Choose any fun pattern paper to match the theme or color of the party. You can add it to a tea cup as a party favor gift for a touch of fun!


Sunday, March 25, 2012

Grounds for Sculpture

This is just a couple of shots that I took at Grounds for Sculpture in Hamilton, NJ. It's an awesome 30+ acre land with all different kinds of sculpture and art exhibit. Weather was in the mid 70's so it was a perfect time to wander around and see some of the interesting art. Looking back on the pictures I took though, I realized that in the end I love taking pictures of people way more than inanimate objects. Funny how that ended up so. :P


Monday, February 20, 2012

Aaron's 1st birthday

A couple months back, a dear coworker of mine was planning her son's 1st birthday party. In Korean culture, the first birthday (dohl) is a big celebration in a child's life. Historically, dohl celebrated a milestone for children during a time when many kids did not live to their first year.

For this big celebration, I helped out in decorating the party with the them of winter ONEderland in mind. Unfortunately, we didn't realize how mild this winter would have been.

Glued white wooden sparkly letters from Michaels onto dowels to create a unique cupcake topper spelling the birthday boy's name!

Blue frosted chocolate cupcakes with handpiped chocolate snowflake courtesy of PaulineBakes!

Vanilla cupcake with frosting coated with sprinkles. The cupcake topper with more sparkly snowflakes  to add to the theme.

Mini vanilla cupcakes with blue frosting and a pearl accent by PaulineBakes

Our doljabi/welcome table. Six cups representing different items were placed for a raffle guessing which item Aaron would pick. The wish tree was a DIY project made by spray painting branches in white and hanging ornaments and snowflake photo frames on them. These were also centerpieces for the table

Snowflake personalized gift bags with dduk (korean ricecake) for adults to take home. The frame holds the invitation for Aaron's birthday

Dessert table. Sparkled the snowflake I found hanging in the background myself. The ones I ordered were plain silver foil and the silver glitter spruced it up. The birthday bunting banner on the bottom reads Aaron's 1st birthday!


Snowflake fondant 2 tiered cake with a bunting banner on top. Amazing work!


I wish I had a better picture of the whole room but unfortunately people started coming in before I was finished decorating :P Nonetheless, all that work pulled together nicely and I am pleased with how everything turned out!

Tuesday, January 3, 2012

it's 2012!!!

I had written a blog post but when I tried to publish it, it deleted everything! It's extremely discouraging to finally get the energy up to write something down and then have it deleted :(

Anywho!!

My absence in no way indicates a lack of craftiness happening in my life :P I have been crafting but unfortunately I have not been documenting it. But we shall get back on the horse!

A couple of months ago, I received a text from a friend:


"Song! Make me one!"

Which of course I couldn't say no, especially since I own the book :P The cute robot amigurumi is from  Crobots by Nelly Pailloux. 

Here is just the head


This is pre-assembly. As you can see the arms are missing. I saved it for last because I was not a fan of the muscle arms the original pattern called for but I wasn't sure what I could do to remedy that.


The finished product! Ultimately I went with a simple tube arm. The actual size of the crobot is small: the size of my hands. It took about 4 hours from start to finish and its definitely a project you can complete in a day. 


I must admit that there were certain parts of the pattern that was confusing. It felt like certain steps were missing and I had to make guesses. I'm not sure if that's my inexperience reading patterns or a flaw in the pattern writing. Nonetheless, the 20 different robot designs are original and extremely creative and worth picking up!